Monday, July 07, 2008

New Amsterdam Public Market


Maybe you remember last December, when I posted about a regional, season market that was held, for one day only, at New York City's abandoned fish market at the South Street Seaport? New Amsterdam Public, the non-profit organization that made Wintermarket a great success, was at it again last weekend!

I won't go into too much detail here about New Amsterdam Public (read my Wintermarket post for more details), but the gist of their goal is to establish a permanent indoor market for regional, sustainable food in the Seaport's historic New Market Building and its neighbor, the Tin Building, which have been the loci of South Street's four centuries of public markets, and which have stood empty since 2006, when the Fulton Fish Market moved to the Bronx. The buildings are currently publicly owned, but governmental inertia and the conflicting interests of Pier 17's contracted developer have created complex politics around the goal of retaining those buildings as a public market. Since popular interest drives many decisions regarding public property and services, New Amsterdam has facilitated and hosted three one-day regional food markets as awareness-raising events. The most recent one was last Sunday, and it attracted over sixty vendors and around 7,000 visitors, who strolled through the stalls tasting exquisite cheeses, artisanal breads, glorious summer produce, and jams, pastas, ice creams and honey from all over the region.


Just about everyone covered this event, but I wanted to share a few words on my experience there as a volunteer. My dear friend Annie, who authors the eloquent blog Thoughts on the Table, works for New Amsterdam and coordinated the volunteers; on Sunday morning I found her scrabbling between booths, distributing smocks and organizing enthusiastic. She handed me an apron and directed me to Rick and Helen of Meadowcreek Diary, who were vending a stunning variety of North American raw-milk cheeses. Not strictly local fare, these exceptional cheeses were, I learned, on tour in New York for evaluation for Slow Food's Ark of Taste; the cheese were were selling were what remained of the winners of the Raw Cheese Presidium tasting. I spent a few hours slicing samples and learning to talk cheese - all while nibbling surreptitious bits of Twig Farm Tomme and Rogue River Smokey Blue.

We sold a great deal of cheese, and customers were uniformly happy to be there, excited about local food. Many were amazingly knowledgeable about cheese - what a different experience from your average supermarket, where shoppers pick foods inside cardboard boxes and cashiers can scan a vegetable without even knowing what it is. Across New Amsterdam Market, customers asked complex questions about cultures, pesticides, ingredients, and recommendations for eating, and the vendors knew all the answers and could even speak for the sustainable practices of the growers and producers.

Before I left, I had a few minutes to tour the market myself, tasting and observing community happen - among visitors, among producers, and between producers and consumers. The only thing that makes me happier than food as community is the absolute genius sweet basil and goat cheese ice cream I tried.

Just as I was leaving, the sky blackened and a Seaport-worthy summer monsoon doused the city with fierce buckets. Under cover of the overpass, the market remained mostly dry, and shoppers huddled together and laughed at their flooded feet.


Daring Baker: Danish Braid (for real)

(If you don't know who the Daring Bakers are, read my summary at the beginning of this post.)

The Daring Bakers' June Challenge, a Danish Braid, was a wonderful adventure. As with nearly all DB recipes, this one took time, patience, and a little creativity, but paid back with great pictures, new skills, and above all, hardcore deliciousness.

The braid has two elements: pastry dough and a filling. The pastry recipe provided to the circa fifteen hundred Daring Bakers - originally from Sherry Yard's The Secrets of Baking - I followed to the letter, but bakers were permitted to divine a filling of their choice. Since I'm a sucker for sweetened cream cheese (and I suffered a setback with a failed batch of vanilla pastry cream, which was my other choice), I chose a cream cheese custard filling, which I thought would highlight the unusual flavors in the dough.

The flaky bread of the danish braid is different from other pastry doughs because it it made from yeast (as opposed to, say, pie crust) and uses a block of butter, folded in one "turn" at a time, to create distinct layers - similar to a croissant. This recipe, however, included the unique flavors of orange zest and juice, vanilla, and cardamom, which gave the confection delicious complexity and depth. I added orange and lemon zest to both my filling and icing to unify the tastes and textures.

After combining the ingredients for the dough and allowing it to rest, you roll it into a big rectangle and spread it with a creamy butter-flour mixture, then fold into thirds and chill for half an hour, until the butter is firm. Then the dough is rolled out into a large rectangle again and the rolling-and-folding process is repeated three more times - called "turns" - chilling between each turn; each turn triples the number of layers, so that after a total of four turns, there are 81 layers of pastry dough, separated by layers of butter. Cool, right?

Here is my recipe for the Cream Cheese Custard Filling:

8 ounces softened cream cheese
1/4 cup sugar

1 large egg yolk

1 teaspoon vanilla

1/4 teaspoon salt

2 teaspoons freshly grated orange zest

1 teaspoon freshly grated lemon zest

2 tablespoons all-purpose flour


I just combined these ingredients in a mixing bowl with a hand mixer, folding in the zest at the end so that it didn't all tangle around the beaters. It was creamy, not too sweet, and the delicate citrus flavors shone though just enough to make it match the pastry dough.

To assemble the danish, the dough is rolled out into a huge rectangle, and the long sides are cut into a fringe of 1/2"x5" strips. The filling is ladled into the center and spread around to fill the length of the danish, then the ends are tucked in and the strips are folded over the filling in an alternating pattern, which creates the braid effect. (One of the hosts, Sass & Veracity, has a great series of pictures of the assembly.)

I made my dough on a Saturday, but I didn't get around to making the whole danish until the following Tuesday; during the interim, the dough was marooned in the fridge, tightly wrapped. Pastry dough freezes well, but bakers do not advise refrigeration for more than 24 hours; I ignored their advice and was pleased to see my dough rise so nicely. In fact, there was so much of it that I made it extra long and was able to trim off some edges during assembly (which is why, I think, my danish came out so geometrically straight and symmetrical). I was ready to scoff at the no-longterm-refrigeration advice publicly, until I noticed how many other participants had made two braids. Two? One was, I felt, challenging enough - why had nearly everyone doubled the recipe? I finally figured out that the dough recipe was meant to be halved, and that perhaps my refrigerated dough had not risen so well as I thought.

After this discovery (which occurred while my braid was in the oven), I was ready for a very dense danish indeed. I kept peering in the oven window to see whether it would leak or morph into a giant super-braid...but it just rose gently, browning in the most perfect way. It even cooked quicker than the recipe stated it would - with twice the dough!

I whipped up a little icing with powdered sugar, water, and citrus zests, and drizzled it over the warm danish, then cut myself a slice.

Absolute heaven. Utterly (and if you know me you'll know I rarely say this) flawless - light, buttery, moist, just the right proportions of pastry to filling (I hate those danishes that don't have enough filling! UGH!), and the citrus and cardamom shone through ever so delicately. I can't think of a better item to serve for tea or brunch - it was so long and elegant, impressive but not impossible, and downright delicious.

I have no idea what will happen if I try and recreate it without the fridge-side downtime. :) Maybe someday I'll let you know... Thanks for another wonderful challenge, Daring Bakers!

Tuesday, June 24, 2008

Daring Baker: Danish Braid

My dear readers and fellow daring bakers - I have SO SO SO much to tell you, and I'm a day late for the Daring Bakers (I just typed Darting Bakers, which was a typo, but in retrospect seems appropriate) monthly post, too - but the last four days have been a culinary whirlwind of sipping herbed granité at the Food, Body, Planet benefit, snapping food photos for Pure Food and Wine, selling cheese at New Amsterdam Public's sustainable/regional market, and baking an honest-to-goodness wedding cake (and creating floral arrangements!) for my best friend's wedding last night. My blog is struggling to keep up with all that!

So for now, here are a couple of "teaser" shots of my Cream Cheese Danish Braid, made for the Daring Bakers' June Challenge, with more - and yummier! - images to come with the full post. If you just can't get enough, check out the Daring Baker's blogroll (not sure how recently updated that site is - our new site is under construction) to see many other braids - wonderful work, bakers!

I'll be back soon with stories to tell of cheese, monsoons, and wedding cake...


Thursday, June 19, 2008

The Best Mess

Sometimes praise comes at unlikely moments. Like during a slapped-together Tuesday night "dinner" consisting of a heap of steamed asparagus and a messy bowl of unattractive, sticky-sweet chicken wings.

"This might be my one of my favorite foods you've ever made," J declares seriously, licking sauce off his fingers. He even declines a movie with dinner so he can "concentrate on this amazing chicken."


It's hard not to measure success in moments like these. If only success in pairing oneself with such a generous palate.


Sweet Soy-Glazed Chicken Wings


INGREDIENTS*

1 tablespoon grated fresh ginger

4 cloves minced garlic

3 scallions, chopped into 1/4-inch pieces

1/2 cup soy sauce

1/4 cup ketchup

2 tablespoons white vinegar

1/2 cup brown sugar

3 tablespoons honey

Crushed red pepper, to taste


1/4 cup peanut oil (or other vegetable oil)
8-10 whole chicken wings (about 1 1/2 lbs.)


DIRECTIONS


To prepare wings, take a sharp knife or kitchen shears and cut off the wing tip (I freeze the tips to use later for stock) , then cut at the joint, separating the drummette and the wingette. If desired, trim off excess flaps of skin. (This recommendation is not particularly for health purposes - I just don't care for the texture of extra skin in this recipe.)


Combine fist nine ingredients in a medium bowl, mixing thoroughly until sugar dissolves; Add wings and toss to coat. Cover and marinate for one hour at room temperature, or up to overnight in the fridge (though your scallions will lose some texture).


Remove wings from marinade and place in a separate bowl. Warm up a large skillet or wok over medium-high heat; add oil to the pan. When oil is hot, pour in the marinade; when the mixture begins to foam, arrange the chicken wings in the pan so that they are all touching the bottom. Cover and cook on medium heat for 20-25 minutes or until cooked through, turning wings periodically to prevent sticking. After 20 minutes, if sauce seems thin, cook uncovered for remaining time.


Serve hot, with extra sauce and plenty of napkins.


*I wasn't measuring, so all amounts are approximated. Feel free to do your own estimating!

Tuesday, June 17, 2008

Local Event: Food, Body, Planet

Play4Life, a cross-national children's food advocacy organization, is hosting a yummy NYC benefit event on Thursday, June 26, called Food, Body, Planet. If you can afford to snag a ticket, come out and support local food programs and the expansion of this awesome group, Powerful Lifestyles Advancing Youth, whose mission states that:

"Play 4 Life, Inc. is committed to transforming the lifestyles of America's youth by empowering school-age children to use their natural inclination toward play and creativity in the four areas of cooking, movement, conscientious eating and gardening. Our programming encourages community collaboration to advance today's youth in realizing their goals and dreams by teaching that a healthy body can produce and sustain a healthy mind."


Food, Body, Planet focuses on the importance of local, organic eating, and will feature all-star food sustainability scenesters such as prolific food writer Joan Gussow, Slow Food USA's formidable director Erika Lesser, and artist, activist, and outspoken locavore Leda Meredith. Your $95 (or $150 for two) also gets you a local, sustainable food tasting by ten chefs, including health activist and Top Chef Andrea Beaman, local wine and beer tasting (featuring the delightful Peak Organic Brewing Company), and a silent auction of wellness-related products and services, as well as student art. Sound like fun? See you there!

Event: Food, Body, Planet, hosted by Play 4 Life

When: 7-10 PM, Thursday, June 26

Where:
CUE Art Foundation
511 West 25th Street
New York, NY 10001


Tickets: NYCharities.org


I am affiliated with Food 4 Life via the NYC Food Systems Network, a "membership based organization designed to foster communication and cultivate community amongst various stake holders and professionals working across the food system." They're a wonderfully useful network - sign up!

Thursday, June 05, 2008

Cakespiration: Round 1

Let me just cut to the chase and say that I am going to bake my own wedding cake next year. Don't sigh like that! Don't give me that exasperated look! It was hard enough, acknowledging that I probably oughtn't single-handedly prepare dinner for fifty-odd guests on my wedding day. Yes, I know it will be a busy time, I know I will be spazzing out about a million other things, but I am going to make my cake, okay?

Why? Because baking cake is my favorite thing ever. :)

In case you were concerned, the cake pictured above is not my wedding cake. Rather, it is, in traditional bootstraps-in-the-sky fashion, Lesson One in my self-taught series, How to Bake Your Own Wedding Cake! Get ready...

* * * * * * * * * * * * * * * * * * * * * * * * * * * * * * * * * * * * * * * * *
Lesson One: Structural Integrity

I had never made a stacked cake before, beyond regular layer cakes - never anything tiered. (in fact, last time I made an eight-layer peanut butter cake, the middle layers oozed woefully out one side. A delicious, embarrassing mess!) The point of my first trial cake was to learn the rules of Big Cakery - that is, what makes it stand up? What keeps it from collapsing into itself? How do you stabilize a cake? I decided to focus on these questions and leave fillings and decorating for another trial.

The first thing I learned is that different types of cake are good for different styles. Light, airy cakes like angel food or sponge cake are good for sheet cakes or tall cakes with separate tiers, but bad for stacking, since the cake itself can't provide much support. Shortened cakes (pound cake or any basic butter cake) have a higher density that can make tiers precarious, but is great for stacked layers. For my first trial wedding cake, I wanted to stack - so I went with a shortened cake: Tish Boyle's Basic Golden Cake Layers (The Cake Book, page 120; recipe approximated here). I made one-and-a-half times the recipe for three layers: a five-inch, a seven-inch, and a ten-inch.

I divided the batter to an even depth between the three pans (though, in retrospect, I should have added a bit more to the biggest pan, to give that layer a little extra height), and baked them for 45, 50, and 55 minutes, respectively. I cooled them in the pan for 30 minutes, then removed them onto cardboard circles I had cut out of cereal boxes and covered in foil, and let them cool completely. To make the layers perfectly flat, I used a long, serrated knife to cut the domed top off of each one; then I cut each cake in half horizontally to create two layers.

Obviously, I used the presence of the discarded domes as an opportunity to taste the cake. It was great! I know that some people are picky about having wedding cake be white, which is achieved by excluding egg yolks, but I like the richness and moisture that yolks add, so I used a yolky recipe. The result was an ivory-colored, tender crumb that was just sweet enough and very vanilla-y. Delicious!

Next up: icing. I had never made or worked with fondant before, so even though it isn't my favorite, I decided to give it a go. At the very least, fondant is great for sculpting decorations, so I figured I might as well give learn my way around that chewy confection. But first, the fondant needs a layer of buttercream to help it adhere to the cake and seal in moisture.

I had read that buttercreams containing some vegetable shortening are good for outdoor events - which our wedding will be - because the shortening raises the melting temperature, so I decided to try it out and see how much the shortening affected the taste (I worked from the first recipe from this website, although I made a few minor changes). And, while the icing was easy to work with and didn't get too soft during assembly - despite my steamy summer kitchen - I felt that it was definitely "short" on flavor. I carefully iced each tier, spreading thick between cake layers and very thin on the top and sides, then put the whole lot in the fridge to chill and stiffen up a little, so it wouldn't goosh out the bottom when I applied the fondant.

While the iced layers were chilling, I made my fondant. Now, I find that fondant, by and large, tastes like vinyl, but my soon-to-be-sister-in-law once made J and I an engagement cake with fondant made with marshmallows (rather than the traditional corn syrup), which I found more flavorful and delicate, so I went with that. It couldn't have been easier - I put 16 ounces of mini marshmallows in a large bowl with two tablespoons of water and microwaved it for about two minutes, pausing every thirty seconds and giving it a stir. Once the marshmallows were melted, I poured the warm, sticky mass out onto a heavily-greased counter and kneaded in a pound and a half of powdered sugar (with equally heavily-greased hands - take off your rings or else!). Once the mass looked a bit like gluey bread dough (re-grease hands and counter when necessary), I added in another half a pound of sugar, a little at a time, and a teaspoon of vanilla extract. After about eight minutes, I achieved a firm, elastic ball of doughy fondant. (If it seems like it's tearing easily, knead in a little water, about a half a teaspoon at a time.) It's wise to let it rest for at least thirty minutes here before rolling it out.

Once my fondant had rested, I divided into three balls, which I estimated to be appropriately relative in size. I cleaned my counter top and dusted it with cornstarch, then carefully rolled out each ball to about a 1/8th-inch thickness - some people prefer to work with a greased counter top at this stage, rather than starch, but bear in mind that if your fondant tears, sealing it back together without a line is almost impossible with greasy dough!

About here, it became clear that I had made way too much fondant. I draped each sheet over the chilled cakes, gently shaping the edges with my hands (there's a special tool that makes this process a lot easier and more geometric), and used a serrated knife to trim off the plentiful excess "skirt."

Now for assembly. I inserted four evenly-spaced dowels into each of the bottom two layers to provide support; wooden dowels are advised, but I don't have a saw and I hadn't thought to use drinking straws, which would have been better, so I used sucker sticks, which are made out of tightly-rolled paper. I was worried that they might disintegrate in the moist cake over a period of days, but they ended up working just fine. Anyway, I trimmed each stick to be exactly level with the fondant, then rested the next layer on top. (If this had been an important cake, I would have measured, but my eyeballed efforts looks fine.) The last step is to insert a long, sharpened dowel all the way through the cake from top to bottom, piercing the cardboard cake boards as you go, but I didn't have a long or sharp enough dowel, so I skipped that step and hoped for the best.

I hadn't intended to decorate at all, but the foil-covered cardboard glimmered out from under each later slightly, so at the last minute I added some bright green food coloring to my leftover buttercream and dabbed on some messy impromptu ruffles with a Ziploc baggie (I haven't bought a pastry bag or decorating tips yet). Suddenly I had something approximating a St. Patrick's Day cake - but that was alright. It was upright, symmetrical, stable! Victory!

We sliced the top layer after dinner. I wasn't anticipating a flavor powerhouse or anything, but like most wedding cakes, the taste was a bit of a letdown. The cake itself was moist and tender (Tish's cookbook never lets me down), but the buttercream was a little waxy, and the fondant...well, it was better than most fondant, but, you know.

A cake that size makes about 40 wedding-size (a.k.a. teensy) slices, so even while pawning off slabs of it to neighbors and friends, I had a few days to see how it aged, which is important, since most wedding cakes are made a day or two ahead of time. My observations are as follows:

- No slipping, sliding or sinking occurred at any point, despite the fact that the cake underwent various forms of transportation over the weekend to a number of friends' houses, without a central dowel. So A+ for structural integrity!

- A layer entirely encased in fondant (no missing slices) stayed very moist and fresh for three days; sliced cake dried out quickly, even when wrapped up or protected with parchment paper.

- The buttercream improved over time as some of the sugar crystallized and acquired a little texture. I also realized that it would have been much improved with an extra bit of salt. Also, most people who ate the cake seemed to like the buttercream more than I did, so maybe I'm just sensitive about shortening.

- Nobody likes fondant, even good fondant. So I guess I'm ruling fondant out, despite its protective qualities. This scares me a little, because the hardest part of making the cake was getting the buttercream even (some tools would help) and keeping it crumb-free. Any advice on how to keep pesky crumbs out of pristine buttercream?

I also think that my brief flirtation with vanilla-all-the-way wedding cake is over; at the very least, I'd opt for a lemon curd filling. I'm definitely ready to discard the White Wonder and move on to more adventurous flavors. Speaking of which - my best friend is getting married in a couple of weeks, and she's commissioned me to make a cake for their informal affair. A red velvet cake! It will be a small crowd - maybe twenty people, tops - so I think I might take the opportunity to try pillars! On the subway! I think my blog has found a theme...?

* * * * * * * * * * * * * * * * * * * * * * * * * * * * * * * * * * * * * * * * *
Things I want to learn about next:

- using columns;

- the durability of un-fondanted buttercream, whether I can use a cream cheese frosting, and whether the aforementioned options will melt outside;

- How long in advance buttercream can be made;

-How much cake layers are affected by being frozen (should they be iced first?).

Lastly, have any of you readers enjoyed memorable wedding cake (or other-event-cake)? What was special about it?

Here are some beautiful cakes that inspire me. :)

Sunday, May 18, 2008

Breadfellows

Baking bread: that most basic of all acts, despite its complexity.
Baking bread: christening a kitchen, blandishing the restive spirits of good fortune back into the warm corners of your home.
Baking bread: creating in the face of destruction; healing wounds.
Baking bread: remembering.
Baking bread: the fragrant anchor, falling towards earth.

* * * * * * * * * * * * * * * * * * * * * * * * * * * * * * * * * * * * * * * * * *

All of the sentiments I have for baking bread seem too heavy-handed for Spring. As the days lengthen out like lazy cats on a sun-warmed carpet and the trees begin their verdant inhalation, dappled light decorates my floured countertops and I bake bread to remember, to heal, to cajole good fortune out of its hiding places - but mostly, I do it to celebrate. It's an ungainly festivity - long pauses while dough rises and crust browns - and I do it awkwardly, winging recipes, tugging my apprehensive life forward by the reins - but I must say that the inertia, however unwelcome, is worth celebrating. And perhaps I am the one in the bridle. Lingering.

Companion: breadfellow, messmate; from the Latin com- (with) and panis (bread). But any two people can share bread, if they are hungry enough; it takes a special sort of companion to bake it with you. This is what I celebrate: the one who shapes the dough for the second rise, who walks alongside me in the forest, who holds my hand while I tarry.

* * * * * * * * * * * * * * * * * * * * * * * * * * * * * * * * * * * * * * * * *

Poem
By Gregory Orr

This life is like no other.
The bread rising in the ditches.
The bellies of women swelling
with air.
Walking alone under the dark pines,
a blue leather bridle in my hand.

* * * * * * * * * * * * * * * * * * * * * * * * * * * * * * * * * * * * * * * * *

Honey Wheat Bread
Adapted from Williams-Sonoma's Essentials of Baking

INGREDIENTS

2 packages (5 teaspoons) active dry yeast

2 cups whole milk, heated to warm (105-115 degrees F)

1 tablespoon brown sugar

1/4 cup honey
2 large eggs

3 cups whole-wheat flour, plus extra for kneading

3 cups all-purpose flour

2 teaspoons sea salt

6 tablespoons unsalted butter, at room temperature

DIRECTIONS


In a large bowl, sprinkle the yeast and brown sugar over warm milk and let stand until foamy, about five minutes. Whisk in the eggs and honey; add flour, salt, and butter and stir with your hand or a wooden spoon until combined into a rough dough.


Scrape the dough out onto a lightly floured surface and knead until it is smooth and elastic, about five minutes, occasionally dusting the work surface with only enough whole wheat flour to keep the dough from sticking.
Shape into a ball and transfer to a lightly oiled bowl. cover the bowl with plastic wrap or a damp towel and let rise in a warm, draft-free area until it doubles in size, 1 1/2 to 2 hours.

While dough is rising, lightly butter two 9x5 inch loaf pans.

Punch down the dough and divide in half. With each half, evenly flatten the dough with the heel of your hand until it is about one inch thick, then roll the bottom third up onto itself and seal it by pinching the seam together. Continue rolling and sealing until you have an oval log; Place the logs, seam side down, into the prepared pans.
Cover loosely with a damp towel and and allow to rise until doubled again, 45-60 minutes.

Preheat oven to 375 degrees F. Dust the tops of the loaves with whole wheat flour and bake int the center of the oven until they are honey brown and sound hollow when tapped on top, 35-40 minutes. Be careful not to overbake, as they will become dry. Carefully remove the loaves from the pans and let cool completely before slicing. (Hot slices are delicious, but much of the bread's moisture escapes via steam - so if you do go in for a hot slice, be sure to stand the loaf up afterwards, cut-side-down against the plate or cutting board, until fully cooled.)


This recipe creates a slightly sweet, springy bread with just a hint of scone-like crumble, due to the higher butter content. It was divine for breakfast and turkey sandwiches alike, and filled the house with an exquisite nut-and-honey aroma.

For those of you curious about/coveting my butter dish: it's a countertop-friendly butter bell (or butter keeper) with a water seal that keeps your butter cool and fresh without refrigeration! It's perfect for those of us who like soft butter handy, but are concerned about spoiling. It works like a charm and has an appealing, antique look. This one was a gift from my FMIL*, but you can find a variety of attractive butter bells online.

*future-mother-in-law :)

Friday, April 04, 2008

A Picture is Worth a Thousand Memes

I saw this picture meme over at Eyre Affairs and just couldn't wait to try it out, so I took the liberty of tagging myself (Well, Amy had extended an open tag to all bloggers):

1. What is your current relationship status?


2. What is your current mood?


3. What is your favorite band/singer?

4. What is your favorite movie?


5. What kind of pets do you have?

6. Where do you live?

7. Where do you work?


8. What do you look like?

9. What do you drive?


10. What did you do last night?


11. What is your favorite TV show?


12. Describe yourself.


13. What are you doing tomorrow?


14. What is your name?

15. What is your favorite candy?

(That would be a tie between Junior Mints and Bounty Bars.)

So much fun! Thanks, Amy! I feel like this meme has so much potential for refinement - like, you have to take all the pictures yourself, or your images have to have a theme like old movies or animals. Maybe next time...

Anyone who would like to take on this meme: consider yourself tagged. And feel free to add more questions! :)

Sunday, March 30, 2008

Daring Baker: Cakes on a Train!

Nothing about my first post as a Daring Baker is going quite how I planned it.

For those of you who aren't familiar, the Daring Bakers are a group of fearless pastry entrepreneurs - there are some 700 of us now - who, once a month, all bake the same thing at the same time. Founded in 2006 by my friend Ivonne of Creampuffs in Venice and Lis of La Mia Cucina, the growing group vows not to reveal the selected recipe until the prescribed date. This month's recipe, proffered by Morven, is Dorie Greenspan's "Perfect Party Cake" from her cookbook Baking: from My Home to Yours (page 250). You can see several hundred versions of this cake over at the Daring Baker's Blogroll!
So I haven't told you all this, but I'm moving. Or rather, I moved yesterday; I am currently hunching amid towers of boxes in my half-assembled new home (J and I now share an office, so we're presently sitting at our respective desks, back-to-back). Never fear, neighbors and Brooklyn enthusiasts - we are still proud residents of Bedford-Stuyvesant, Brooklyn...since we only moved five and a half blocks.

It's a long story that I won't get into now. But prior to moving, I was packing, painting and panicking, and frankly, party cake was the last thing on my mind.

To be fair, I wasn't too enthused about this recipe to begin with. I - don't kill me - don't particularly care for Swiss meringue buttercream (egg whites and sugar are whipped over heat until a marshmallow-fluff-consistency meringue develops, then softened butter is beaten in). I find it a little waxy and...oh, i don't know, butter-textured. I knew that a white cake with the light, perky flavors of lemon, raspberry and coconut would be divinely spring-timey, but I guess I was still feeling wintry here in Manhattan, bundled up in my big coat with a lot of things to do.

So I approached this cake with dedication, it being my first attempt as a Daring Baker, but also with a certain amount of brisk, I-can't-be-botheredness that I suppose wasn't really in the spirit of Daring Bakerhood. An occasion to make a cake presented itself - a coworker's birthday - and while I enjoyed the baking and assembly process as much I always do, I think I would have had a better time (and better results!) if I had taken a few moments to experiment (within the strict parameters of DB rules, that is). I didn't do any variations or try anything fancy - this is Dorie's cake all the way.
My cake came out beautifully: snow white, sleekly iced, swathed in a coconut scarf, crowned with a ring of plump raspberries. It survived a crowded and hectic subway journey from Brooklyn to midtown under a glass dome, and elicited several oohs and aahs from adjacent passengers. My coworker was appropriately surprised and (I hope) charmed by its appearance. It sliced like a dream, with crisp, elegant veins of jam running perfectly parallel. I served each of us a picture-perfect wedge. Forks clattered and there were a few appreciative murmurs. I describe the Daring Bakers, by way of making conversation.

"Wait, you made this?" My boss looked confused.

"Yeah," I replied, half-smiling.

"I thought it was store-bought. Very impressive," he nodded and sidled back to his desk.

It was meant to be flattering. But store-bought is pretty much how I would have described this cake too - and the problem I had with it. You see, the pure-white, straight-laced, wax-figure elegance of this cake - which endured virtually unchanged in the refrigerator over the subsequent weekend, store-bought style - lacked that quality that I feel sets a homemade cake apart: ephemeral decadence. There was no toothache-sweet caramel, no dense, moist crumb, no creamy pudding filling - not to mention the absence of wonky icing handwriting and layers all akimbo. This symmetrical white wonder lacked personality and satisfied no particular craving.

So I think I learned something about what it means to be a daring baker. It's not about producing some Platonic Form of the recipe; there's no prize for The Perfect Cake. That isn't even very daring! What's daring is to explore new realms of creativity in appearance and flavor. So I made a store-bought cake at home, and I can't wait for next month. Thanks, Daring Bakers!


Dorie Greenspan's Perfect Party Cake

Words from Dorie
Stick a bright-coloured Post-it to this page, so you’ll always know where to turn for a just-right cake for any celebration. The original recipe was given to me by my great dear friend Nick Malgieri, of baking fame, and since getting it, I’ve found endless opportunities to make it – you will too. The cake is snow white, with an elegant tight crumb and an easygoing nature: it always bakes up perfectly; it is delicate on the tongue but sturdy in the kitchen – no fussing when it comes to slicing the layers in half or cutting tall, beautiful wedges for serving; and, it tastes just as you’d want a party cake to taste – special. The base recipe is for a cake flavoured with lemon, layered with a little raspberry jam and filled and frosted with a classic (and so simple) pure white lemony hot-meringue buttercream but, because the elements are so fundamental, they lend themselves to variation (see Playing Around), making the cake not just perfect, but also versatile.

For the Cake

2 1/4 cups cake flour (updated 25 March)
1 tablespoon baking powder
½ teaspoon salt
1 ¼ cups whole milk or buttermilk (I prefer buttermilk with the lemon)
4 large egg whites
1 ½ cups sugar
2 teaspoons grated lemon zest
1 stick (8 tablespoons or 4 ounces) unsalted butter, at room temperature
½ teaspoon pure lemon extract

For the Buttercream
1 cup sugar
4 large egg whites
3 sticks (12 ounces) unsalted butter, at room temperature
¼ cup fresh lemon juice (from 2 large lemons)
1 teaspoon pure vanilla extract

For Finishing
2/3 cup seedless raspberry preserves stirred vigorously or warmed gently until spreadable
About 1 ½ cups sweetened shredded coconut

Getting Ready
Centre a rack in the oven and preheat the oven to 350 degrees F. Butter two 9 x 2 inch round cake pans and line the bottom of each pan with a round of buttered parchment or wax paper. Put the pans on a baking sheet.

To Make the Cake
Sift together the flour, baking powder and salt.
Whisk together the milk and egg whites in a medium bowl.
Put the sugar and lemon zest in a mixer bowl or another large bowl and rub them together with your fingers until the sugar is moist and fragrant.
Add the butter and working with the paddle or whisk attachment, or with a hand mixer, beat at medium speed for a full 3 minutes, until the butter and sugar are very light.
Beat in the extract, then add one third of the flour mixture, still beating on medium speed.
Beat in half of the milk-egg mixture, then beat in half of the remaining dry ingredients until incorporated.
Add the rest of the milk and eggs beating until the batter is homogeneous, then add the last of the dry ingredients.
Finally, give the batter a good 2- minute beating to ensure that it is thoroughly mixed and well aerated.
Divide the batter between the two pans and smooth the tops with a rubber spatula.
Bake for 30-35 minutes, or until the cakes are well risen and springy to the touch – a thin knife inserted into the centers should come out clean
Transfer the cakes to cooling racks and cool for about 5 minutes, then run a knife around the sides of the cakes, unfold them and peel off the paper liners.
Invert and cool to room temperature, right side up (the cooled cake layers can be wrapped airtight and stored at room temperature overnight or frozen for up to two months).

To Make the Buttercream
Put the sugar and egg whites in a mixer bowl or another large heatproof bowl, fit the bowl over a plan of simmering water and whisk constantly, keeping the mixture over the heat, until it feels hot to the touch, about 3 minutes.
The sugar should be dissolved, and the mixture will look like shiny marshmallow cream.
Remove the bowl from the heat.
Working with the whisk attachment or with a hand mixer, beat the meringue on medium speed until it is cool, about 5 minutes.
Switch to the paddle attachment if you have one, and add the butter a stick at a time, beating until smooth.
Once all the butter is in, beat in the buttercream on medium-high speed until it is thick and very smooth, 6-10 minutes.
During this time the buttercream may curdle or separate – just keep beating and it will come together again.
On medium speed, gradually beat in the lemon juice, waiting until each addition is absorbed before adding more, and then the vanilla.
You should have a shiny smooth, velvety, pristine white buttercream. Press a piece of plastic against the surface of the buttercream and set aside briefly.

To Assemble the Cake
Using a sharp serrated knife and a gentle sawing motion, slice each layer horizontally in half.
Put one layer cut side up on a cardboard cake round or a cake plate protected by strips of wax or parchment paper.
Spread it with one third of the preserves.
Cover the jam evenly with about one quarter of the buttercream.
Top with another layer, spread with preserves and buttercream and then do the same with a third layer (you’ll have used all the jam and have buttercream leftover).
Place the last layer cut side down on top of the cake and use the remaining buttercream to frost the sides and top.
Press the coconut into the frosting, patting it gently all over the sides and top.

Serving
The cake is ready to serve as soon as it is assembled, but I think it’s best to let it sit and set for a couple of hours in a cool room – not the refrigerator. Whether you wait or slice and enjoy it immediately, the cake should be served at room temperature; it loses all its subtlety when it’s cold. Depending on your audience you can serve the cake with just about anything from milk to sweet or bubbly wine.

Storing
The cake is best the day it is made, but you can refrigerate it, well covered, for up to two days. Bring it to room temperature before serving. If you want to freeze the cake, slide it into the freezer to set, then wrap it really well – it will keep for up to 2 months in the freezer; defrost it, still wrapped overnight in the refrigerator.

Playing Around
Since lemon is such a friendly flavour, feel free to make changes in the preserves: other red preserves – cherry or strawberry – look especially nice, but you can even use plum or blueberry jam.

Fresh Berry Cake
If you will be serving the cake the day it is made, cover each layer of buttercream with fresh berries – use whole raspberries, sliced or halved strawberries or whole blackberries, and match the preserves to the fruit. You can replace the coconut on top of the cake with a crown of berries, or use both coconut and berries. You can also replace the buttercream between the layers with fairly firmly whipped sweetened cream and then either frost the cake with buttercream (the contrast between the lighter whipped cream and the firmer buttercream is nice) or finish it with more whipped cream. If you use whipped cream, you’ll have to store the cake the in the refrigerator – let it sit for about 20 minutes at room temperature before serving.

Tuesday, March 04, 2008

Forbidden Fruit

Just a quick check-in to share this compelling peek into Minnesota's local food politics. Jack Hedin is a small-time farmer who gets penalized for planting watermelons for local markets on land previously reserved for corn. Because of this violation of "corn-base acreage," not only does he forfeit subsidies (which seems reasonable, insofar as not subsidizing local watermelons is reasonable - which is to say, not at all); he is also penalized for the value of the "illicit" crop.

Federal law effectively prohibits new, small-time cultivation of any crops but the "big four" (corn, soybeans, cotton and wheat) through this cruel and absurd legal system. And, as Hedin points out, consumers are also paying the price - both in produce prices levied to pay for his "violation" and in minimized access to fresh, local fruits and vegetables.

On a large scale, U.S. agricultural policies are shutting down small producers all over the country before they even get a foothold, in order to defend the sovereignty of big fruit-and-vegetable agribusiness in California, Florida and Texas. This is yet another example of federal policy supporting the producers' interests at the expense of consumers.

Note: You might need a New York Times account to view the original article -sign up here. It's free!

Friday, February 22, 2008

Homeland Craving: Irish Currant Scone Cake

I miss Ireland.


It must be something about my Scotts-Irish genealogy that that made me feel so strangely familiar in that place. I never thought I could feel at ease in a treeless landscape, but those undulating green hills – and, strangely, even more so the limestone crags of Aran – gave me a profound sense of home, a deep singing in my bones for heartland.

On sleeting New York days in February, when the morning’s snow melts into gray lumps and children are walking home looking sullen, when the building creaks strangely and black-eyed shadows shiver and scratch in the walls, days like today, my body aches for that green, wide-open place and for the smell of the sea.

So I make tea. I put milk in it. I fill the house with baking smells.

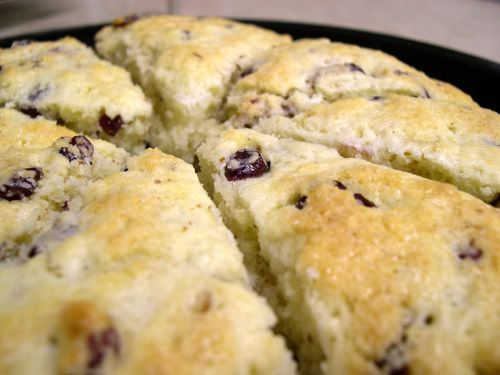
This tender, not-too-sweet tea cake, with its crumbly biscuit texture and juicy currant speckles, is a slice homesick-for-Ireland sympathy. The sweet glaze, infused with Irish whisky, tastes like the melancholy moan of Uilleann pipes rounding out a late-night pub seisiún. Best paired with tea, a journal and good pen.

Irish Currant Scone Cake
Adapted from Nick Malgieri’s cookbook
, Perfect Cakes, 2002

INGREDIENTS

2 ¼ cups all-purpose flour, plus 1 tablespoon
1 teaspoon baking powder
½ teaspoon baking soda
½ teaspoon salt
8 tablespoons (1 stick) unsalted butter, softened but still cool
3/4 cup granulated sugar
1 large egg, at room temperature
¾ cup buttermilk
¾ cup dried currants
1 tablespoon Irish whiskey, such as Jameson
Hot water
1 cup confectioner’s sugar

2 tablespoons heavy cream
2 teaspoons Irish whiskey
One 2-inch-deep 8-inch round cake pan, buttered and bottom lined with parchment or wax paper

DIRECTIONS

1. Set a rack in the middle of the oven and preheat to 350°. Butter an 8-inch round cake pan, and line the bottom with parchment or wax paper.

2. Measure currants into a small bowl. Add 1 tablespoon whiskey and just enough hot water to cover the currants, and allow to soak while combining other ingredients.

3. Stir together the 2 1/4 cups flour, the baking powder, baking soda, and salt in a bowl.

4. In a larger bowl, beat the butter until creamy; add sugar and beat on medium speed until light and fluffy, about 2 minutes. Add the egg, beating until smooth.

5. Decrease the mixer speed to low and beat in half the flour mixture. Scrape down the sides of the bowl; beat in the buttermilk, then the remaining flour mixture.

6. Give the batter a final mix with the rubber spatula, making sure everything is well incorporated.

7. Strain excess liquid out of the currants and toss them with 1 tablespoon flour. Fold them into the batter. Scrape the batter into the prepared pan; dough should be firm, like biscuit batter. Press down into sides of pan and smooth the top.

8. Bake for about 35-45 minutes, or until the cake is well risen and deep gold and a broomstraw inserted in the center emerges clean.

9. While the cake is baking, whisk together the confectioner’s sugar, cream, and remaining whiskey, stirring until smooth.

9. Cool in the pan on a rack for about 10 minutes, then invert the cake onto a plate (I just use my hand, but be very careful not to burn yourself!) and remove the pan and paper. Flip the cake over so it’s right-side up. Spoon the glaze onto the center of the cake and spread evenly over the top, allowing it to drip down the sides. Serve warm or cold, but always with tea.